Introduction
Designing and constructing a two-tier campus network architecture involves creating an efficient and scalable network infrastructure. This approach closely resembles the three-tier hierarchical design and is commonly implemented in medium-sized campus networks. In this article, we will explore the key considerations, best practices, and technical aspects of designing and building a two-tier campus network architecture.
Considerations for Two-Tier Campus Network Design
Before diving into the design and configuration, it’s essential to understand the motivations and requirements for adopting a two-tier campus network architecture:
1. Cost Efficiency One of the primary motivations for adopting a two-tier design is cost savings. By collapsing the core and distribution layers into a single layer, organizations can reduce network infrastructure expenses while maintaining most of the benefits of a three-tier design.
2. Network Size and Growth Two-tier designs are practical for medium-sized campus networks that do not foresee significant growth. It’s essential to assess the network’s expected size and expansion requirements when choosing this architecture.
3. Network Maintenance If your organization has experience with two-tier designs or prefers a simplified network structure that is easy to manage, a collapsed core model can be a suitable choice.
Best Practices Based on Cisco’s Structured Network Design Principles
Cisco emphasizes several structured engineering principles that apply to network design, including:
– Hierarchy Implementing a hierarchical network model simplifies network design by breaking it down into manageable sections.
– Modularity Dividing network functions into modules enhances design flexibility and simplifies maintenance. Common modules include the enterprise campus, services block, data center, and Internet edge.
– Resiliency Networks should remain available under various conditions, including hardware failures and unusual traffic patterns.
– Flexibility Network designs should be adaptable without major hardware replacements.
To meet these design goals, it is crucial to adopt a hierarchical network architecture that allows for growth and flexibility.
Design and Build a Two-Tier Campus Network Architecture
Now, let’s proceed to the configuration of the two-tier campus network architecture. We’ll follow these steps to set up the network:
1. Test Connectivity to the Internet through the ISP Router Before beginning any work, ensure that the ISP Router is functioning correctly, delivering Internet connectivity at the expected speeds.
2. Identify Interfaces on the Firewall Identify the interfaces dedicated to the LAN, DMZ, and WAN networks on the firewall.
3. Configure Interfaces on the Firewall Set up the interfaces on the firewall for each network segment (LAN, DMZ, WAN).
4. Configure Routing Establish routing between the outside and inside networks and set up necessary routes.
5. Configure Access Control Implement access control policies on the firewall using access lists.
6. Configure Network Address Translation (NAT) Set up NAT to translate private addresses to public IPs.
7. Configure DHCP Relay Configure DHCP relay for IP address assignment.
8. Configure Quality of Service (QoS) Implement QoS policies for prioritizing specific traffic types.
9. Configure DNS Set up DNS servers for name resolution.
10. Test and Verify Connectivity Test connectivity from various network segments to ensure proper routing and access control.
For detailed configuration examples and a step-by-step guide, please refer to the article on Design and Build a Two-Tier Campus Network Architecture.
Network Equipment Used
Here is a list of network equipment used in this configuration:
– Cisco ASA ASA5506-x
– SonicWall NSA 220 (configured similarly to Cisco ASA)
– HPE Aruba Core Layer 3 Switch
– HPE Aruba Access Switches (both multiple and single VLAN configurations)
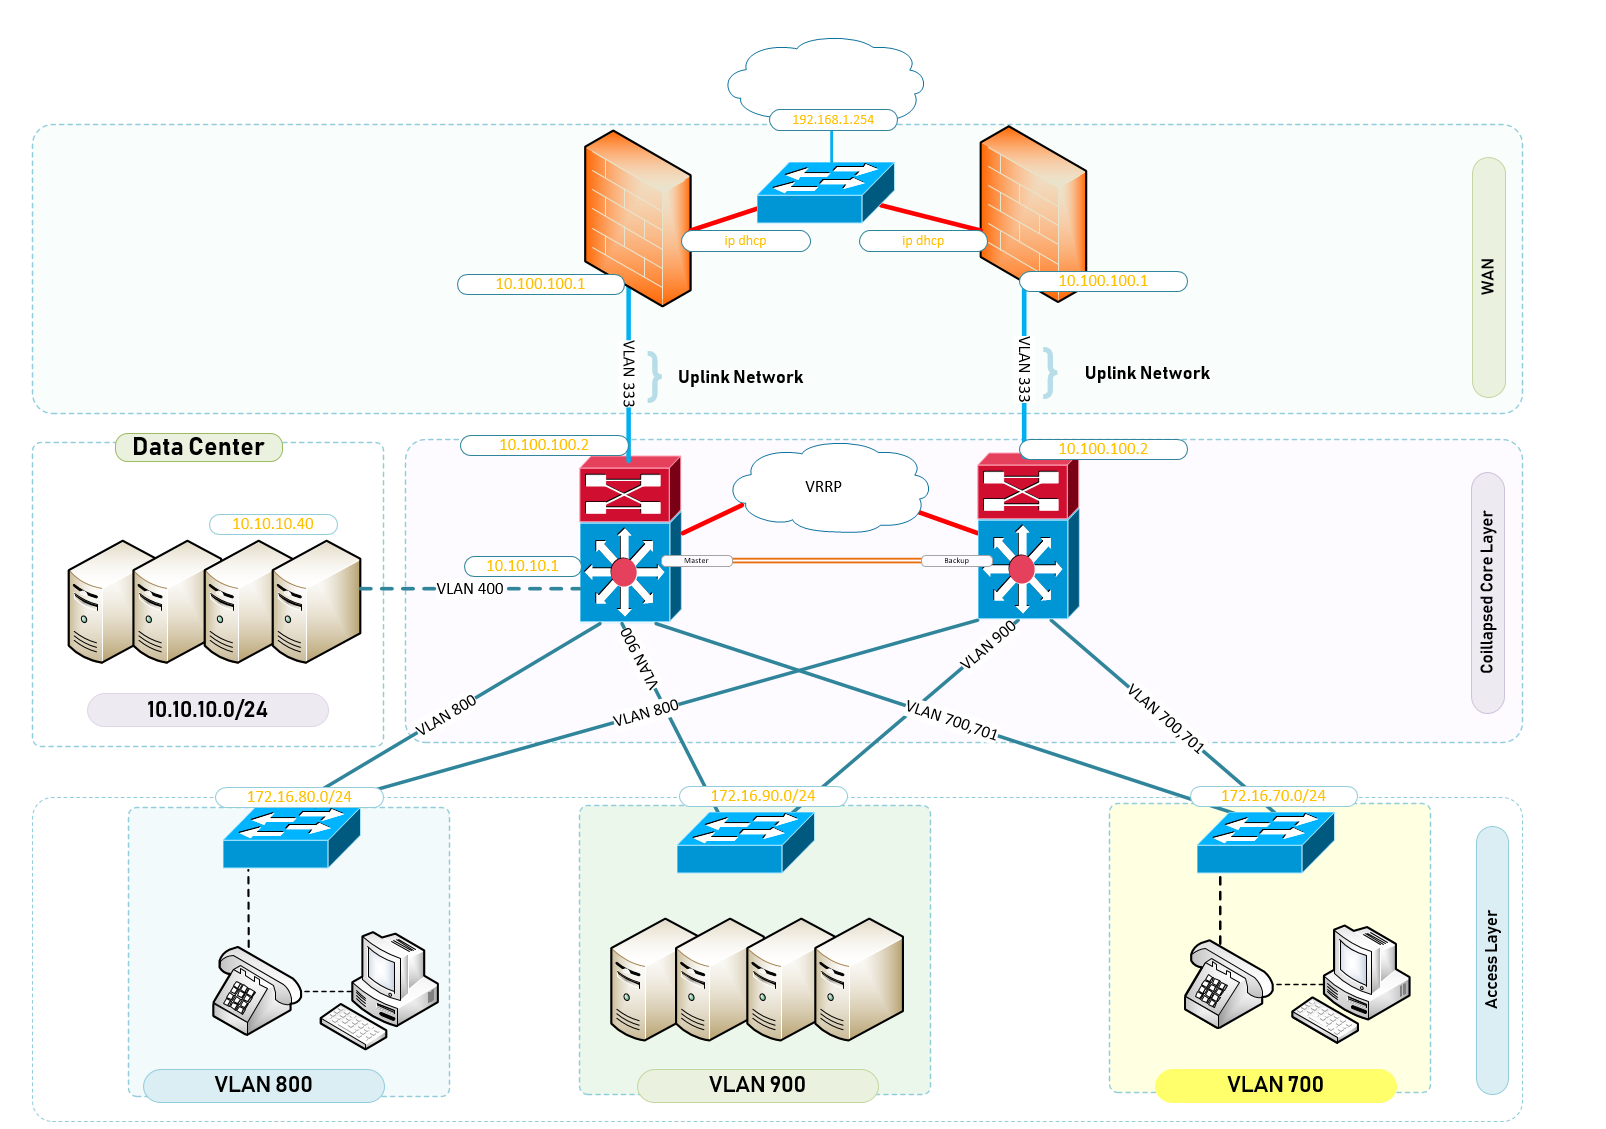
Network Topology
The network topology consists of three key parts:
1. WAN Layer
2. Collapsed Core (Aggregation or Distribution and Core Layer)
3. Access Layer
Each layer serves a specific purpose in the network hierarchy.
Configuration Examples
Below are snippets of configuration commands for different network components. These commands provide a simplified overview of the configuration process for reference:
– Configuring firewall interfaces (Inside, Outside, DMZ).
– Configuring VLANs and SVIs on the core switch.
– Configuring VLANs and interfaces on access switches.
– Configuring routing and routes between network segments.
– Configuring DHCP relay and DNS settings.
Conclusion
Designing and building a two-tier campus network architecture involves careful planning, adherence to best practices, and precise configuration of network components. This architecture offers a cost-effective and scalable solution for medium-sized campuses. Following Cisco’s structured network design principles and best practices ensures a reliable and efficient network infrastructure.
Please note that this article provides an overview of the configuration process, and real-world implementations may require additional considerations and fine-tuning based on specific network requirements and equipment capabilities.