 Internet of Things are everywhere these days, in this article, I detail how to connect an MXCHIP AZ3166 devkit to IoT Hub.
IoT a matter of fact has become a common place in all spheres of human interaction. They are in our refrigerators, cars, gardens, submarines, space probes and robots, they are just everywhere and for a good reason mainly. Before we get super excited and you must be, let us start with the recommended requisites.
Clone Repository for Needed Code | This has been provided by Microsoft
git clone --recursive https://github.com/azure-rtos/getting-started.git
Prepare Your Build Environment
To install the tools:
From File Explorer, navigate to the following path in the repo and run the setup script named get-toolchain.bat:
getting-started\tools\get-toolchain.bat
After the installation, open a new console window to recognize the configuration changes made by the setup script. Use this console to complete the remaining programming tasks in the quickstart. You can use Windows CMD, PowerShell, or Git Bash for Windows.
Run the following code to confirm that CMake version 3.14 or later is installed.
cmake --version
Now that your build environment seem to be correctly setup, go through the next steps to get your local environment setup.
Install Azure IoT Explorer on Your Computer
This part requires a utility called the Azure IoT Explorer which must be installed on your computer. In this demonstration, I have installed the Windows version of the program on my operating system.

Create Azure IoT Hub
This part requires the creation of Azure IoT Hub which could be done using the CLI or Web UI. I will do this using the Web UI but provide the commands for the same in CLI. Follow along;


Successfully Created Azure IoT Hub

Add Device to Azure IoT Hub


Get Connection String
$ az iot hub connection-string show --hub-name mxchip-device-iot-hub.azure-devices.net
Copy the connection string without the surrounding quotation characters.
{
  "connectionString": "HostName=mxchip-device-iot-hub.azure-devices.net;SharedAccessKeyName=iothubowner;SharedAccessKey=UPEgplrCL+zQyabcdefgHiJkWqEXc2vOqulTAQ1k="
}
[ ~ ]$
Add Hubs on IoT Explorer using the connection string

Before continuing to the next section, confirm that you’ve copied the following values:
hostName
deviceId
primaryKey
I made a note of the following elements;
HostName: mxchip-device-iot-hub.azure-devices.net
Device ID : mxchipaz366
Primary Key : KUTkSnC6Sn0vVieeabcdefghijkllU9ko0XCOwKy4=


Configure Connection on Local Repo
Open the following file in a text editor:
getting-started\MXChip\AZ3166\app\azure_config.h
Comment out the following line near the top of the file as shown:
// #define ENABLE_DPS
Set the Wi-Fi constants to the following values from your local environment.
WIFI_SSID	{Your Wi-Fi SSID}
WIFI_PASSWORD	{Your Wi-Fi password}
WIFI_MODE	{One of the enumerated Wi-Fi mode values in the file}

Set the Azure IoT device information constants to the values that you saved after you created Azure resources.
IOT_HUB_HOSTNAME	{Your Iot hub hostName value}
IOT_DPS_REGISTRATION_ID	{Your Device ID value}
IOT_DEVICE_SAS_KEY	{Your Primary key value}

Build the image
In your console or in File Explorer, run the script rebuild.bat at the following path to build the image:
getting-started\MXChip\AZ3166\tools\rebuild.bat


After the build completes, confirm that the binary file was created in the following path:
getting-started\MXChip\AZ3166\build\app\mxchip_azure_iot.bin


Follow the steps here.
Launch Termite and check connectivity
My device is on COM5. You can check for that in Command Prompt by typing mode.

Successful Connection to Azure IoT Hub

Check Telemetry on Azure IoT Explorer

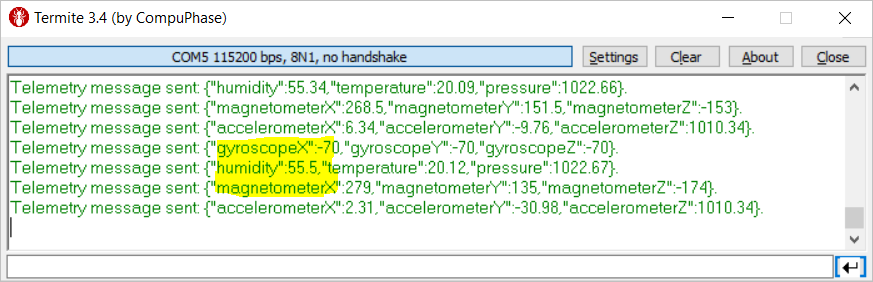
Check Telemetry on Termite
Simulate Device Telemetry
Simply copy paste the following command to Azure Cloud Shell. It will start simulating device as it’s sending messages to IoT Hub. You can click ‘Start’ button from the Telemetry page to start monitoring the events.
az iot device simulate --device-id mxchipdevkitaz3166 --login "HostName=**cloudmxchipiot-01.azure-devices.net;SharedAccessKeyName=iothubowner;SharedAccessKey=slKRd09jokVHPXNjDabcdeEfgHizDhmq8="
View Telemetry Received from IoT Device
az iot hub monitor-events --output table --device-id mxchipaz366 --hub-name mxchip-device-iot-hub
Starting event monitor, filtering on device: mxchipaz366, use ctrl-c to stop...
event:
  component: ''
  interface: dtmi:azurertos:devkit:gsgmxchip;2
  module: ''
  origin: mxchipaz366
  payload:
    magnetometerX: -445.5
    magnetometerY: 531
    magnetometerZ: 496.5

event:
  component: ''
  interface: dtmi:azurertos:devkit:gsgmxchip;2
  module: ''
  origin: mxchipaz366
  payload:
    accelerometerX: -377.04
    accelerometerY: -917.31
    accelerometerZ: -130.66

event:
  component: ''
  interface: dtmi:azurertos:devkit:gsgmxchip;2
  module: ''
  origin: mxchipaz366
  payload:
    gyroscopeX: -770
    gyroscopeY: -420
    gyroscopeZ: 770

event:
  component: ''
  interface: dtmi:azurertos:devkit:gsgmxchip;2
  module: ''
  origin: mxchipaz366
  payload:
    humidity: 60.61
    pressure: 1014.05
    temperature: 19.88

event:
  component: ''
  interface: dtmi:azurertos:devkit:gsgmxchip;2
  module: ''
  origin: mxchipaz366
  payload:
    magnetometerX: -408
    magnetometerY: 504
    magnetometerZ: 495

event:
  component: ''
  interface: dtmi:azurertos:devkit:gsgmxchip;2
  module: ''
  origin: mxchipaz366
  payload:
    accelerometerX: -380.33
    accelerometerY: -915.85
    accelerometerZ: -129.93

event:
  component: ''
  interface: dtmi:azurertos:devkit:gsgmxchip;2
  module: ''
  origin: mxchipaz366
  payload:
    gyroscopeX: -1190
    gyroscopeY: 630
    gyroscopeZ: 2800

event:
  component: ''
  interface: dtmi:azurertos:devkit:gsgmxchip;2
  module: ''
  origin: mxchipaz366
  payload:
    humidity: 60.2
    pressure: 1014.04
    temperature: 20.2

event:
  component: ''
  interface: dtmi:azurertos:devkit:gsgmxchip;2
  module: ''
  origin: mxchipaz366
  payload:
    magnetometerX: -417
    magnetometerY: 531
    magnetometerZ: 486
Communicate with your IoT Device
Run the az iot hub invoke-device-method command, and specify the method name and payload. For this method, setting method-payload to true turns on the LED, and setting it to false turns it off.
az iot hub invoke-device-method --device-id mxchipaz366 --method-name setLedState --method-payload true --hub-name mxchip-device-iot-hub
az iot hub invoke-device-method --device-id mxchipaz366 --method-name setLedState --method-payload true --hub-name mxchip-device-iot-hub
{
  "payload": {},
  "status": 200
}
There are advanced aspects to provisioning IoT devices and the following guide helps you do just that.
Create a new IoT Hub Device Provisioning Service
https://learn.microsoft.com/en-gb/azure/iot-dps/quick-setup-auto-provision#create-a-new-iot-hub-device-provisioning-service
When you encounter this error;
"ERROR: azure_iot_nx_client_dps_entry"
then it is likely you did not comment out #define ENABLE_DPS.