How to Create an Azure Network Infrastructure
How to Create an Azure Network Infrastructure
Networking in the Cloud is quite different to traditional on-premises networking. Whereas in traditional networking, you find nodes connected to a switch which belong in a subnet or broadcast domain with dedicated VLANS for logical separation where necessary, Cloud Networking works a little different from the common technical know how.
Below is a hierarchical breakdown of Azure’s Networking which you may find very handy.
- Location – Azure Regions – list Regions with PowerShell
- Resource Group
- VNet
- Subnet
- NIC
- NSG
- VM
- Public IP
In this article on How to Create an Azure Network Infrastructure, I will walk you through how to design your Azure Network as well as Build your VMs and then enable;
- DNS
- Connectivity
- Gateway Services
- VPN
- Site to Site
What is a Resource Group in Azure Portal?
Resource Group- A container that holds related resources for an Azure solution. The resource group can include all the resources for the solution, or only those resources that you want to manage as a group. You decide how you want to allocate resources to resource groups based on what makes the most sense for your organization.
Create a Resource Group in Azure PowerShell
New-AzureRmResourceGroup -Name uksouth-rg -Location "UK South"
Create a Resource Group on Azure Portal

Create a Virtual Network (VNet) on Azure Portal

Create a Virtual Network using our Azure json Templates
Download Template to create the above:ExportedTemplate-uksouth-rg
Create a Virtual Network in Azure Powershell
$virtualNetwork = New-AzVirtualNetwork `
  -ResourceGroupName uksouth-rg `
  -Location UKSouth `
  -Name uksouth-vnet `
  -AddressPrefix 10.10.0.0/16

What is an Azure Virtual Network (VNet)?
An Azure Virtual Network (VNet) is a representation of your own network in the cloud. It is a logical isolation of the Azure cloud dedicated to your subscription. You can use VNets to provision and manage virtual private networks (VPNs) in Azure and, optionally, link the VNets with other VNets in Azure, or with your on-premises IT infrastructure to create hybrid or cross-premises solutions. Each VNet you create has its own CIDR block and can be linked to other VNets and on-premises networks as long as the CIDR blocks do not overlap. You also have control of DNS server settings for VNets, and segmentation of the VNet into subnets.
Use VNets to:
Create a dedicated private cloud-only VNet. Sometimes you don’t require a cross-premises configuration for your solution. When you create a VNet, your services and VMs within your VNet can communicate directly and securely with each other in the cloud. You can still configure endpoint connections for the VMs and services that require Internet communication, as part of your solution.
Securely extend your data center. With VNets, you can build traditional site-to-site (S2S) VPNs to securely scale your datacenter capacity. S2S VPNs use IPSEC to provide a secure connection between your corporate VPN gateway and Azure.
Enable hybrid cloud scenarios. VNets give you the flexibility to support a range of hybrid cloud scenarios. You can securely connect cloud-based applications to any type of on-premises system such as mainframes and Unix systems.
Create Azure Virtual Network Interface in Azure Portal

Create Azure Virtual Network Interface in Azure with json Templates:
ExportedTemplate-uksouth-rg (1)

A network interface (NIC) is the interconnection between a VM and a virtual network (VNet). A VM must have at least one NIC, but can have more than one, depending on the size of the VM you create. Learn about how many NICs each VM size supports for Windows or Linux. You can create a VM with multiple NICs and add or remove NICs through the lifecycle of a VM. Multiple NICs allow a VM to connect to different subnets and send or receive traffic over the most appropriate interface. If the VM is added to an availability set, all VMs within the availability set must have one or multiple NICs. VMs with more than one NIC aren’t required to have the same number of NICs, but they must all have at least two. Each NIC attached to a VM must exist in the same location and subscription as the VM. Each NIC must be connected to a VNet that exists in the same Azure location and subscription as the NIC. You can change the subnet a VM is connected to after it’s created, but you cannot change the VNet. Each NIC attached to a VM is assigned a MAC address that doesn’t change until the VM is deleted.
Create Network Security Group
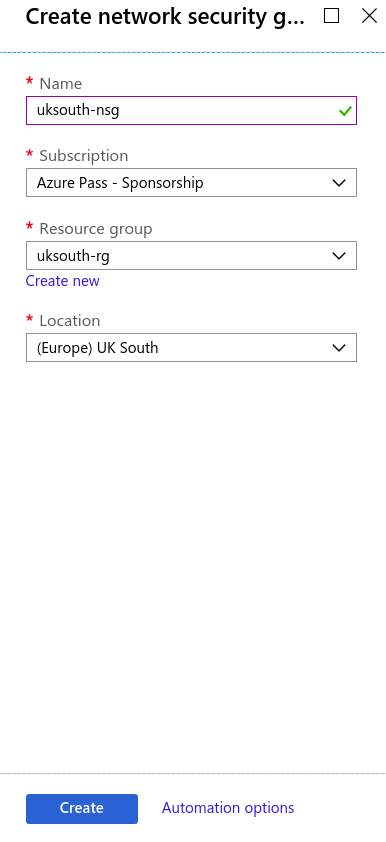
You can filter network traffic to and from Azure resources in an Azure virtual network with a network security group. A network security group contains security rules that allow or deny inbound network traffic to, or outbound network traffic from, several types of Azure resources. To learn about which Azure resources can be deployed into a virtual network and have network security groups associated to them, see Virtual network integration for Azure services. For each rule, you can specify source and destination, port, and protocol.
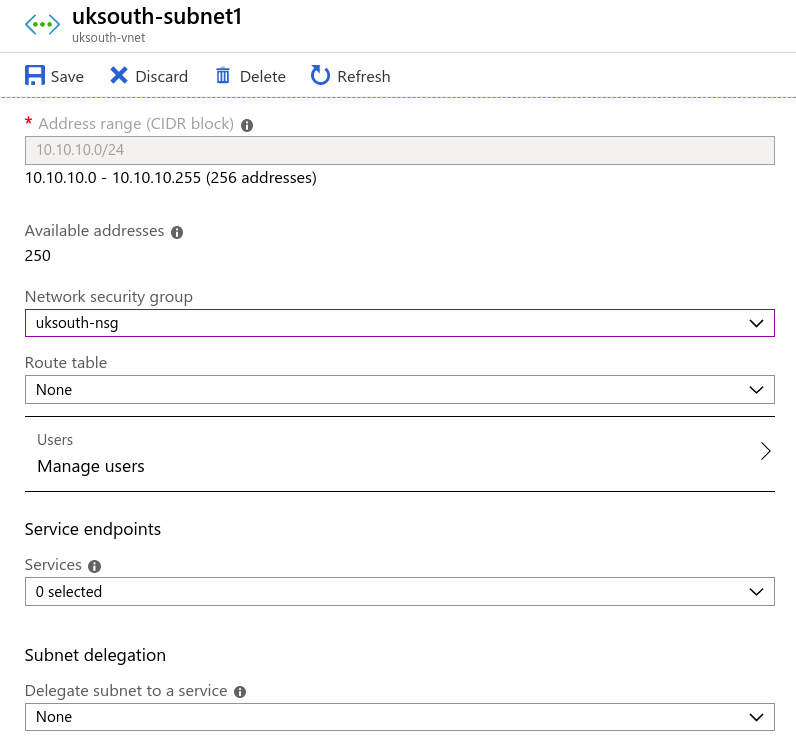
Assign Network Security Group to Subnet
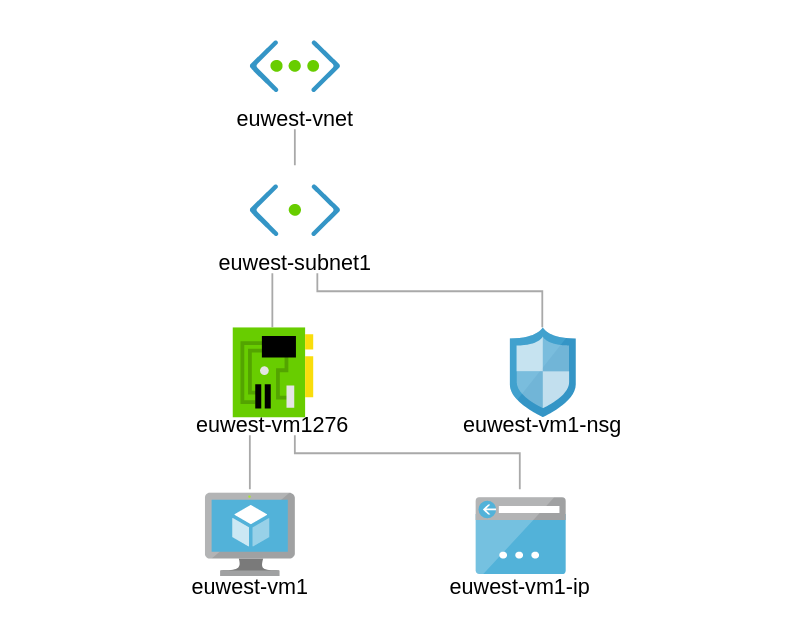
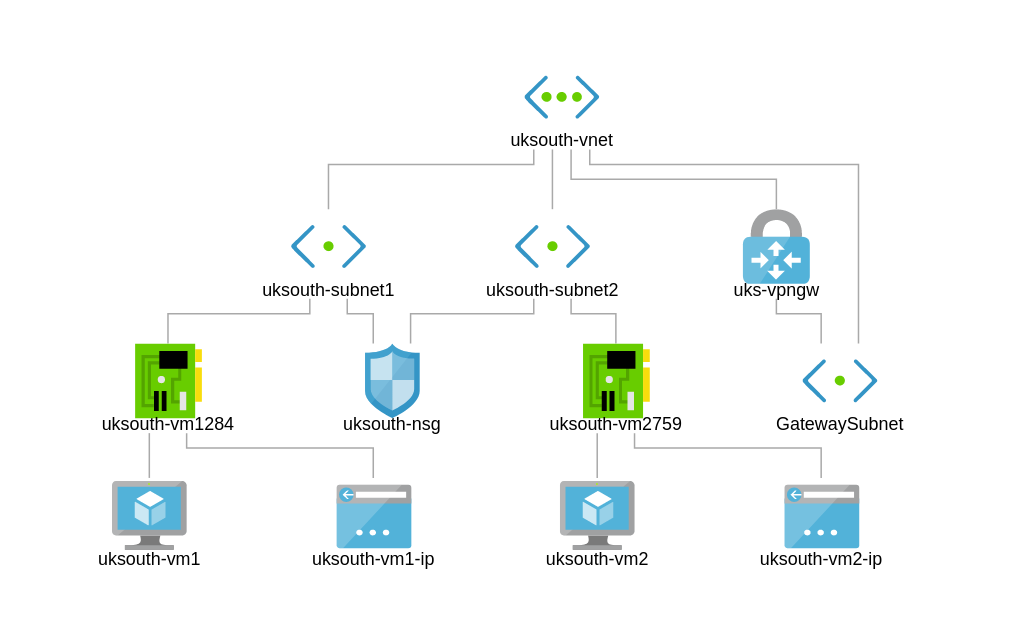
Network Topology – How the Network Design looks so far

Create VM in Azure Portal

Configure Azure Networking for VM

Use Template to build yours: ExportedTemplate-CreateVm-MicrosoftWindowsServer.WindowsServer-201-20191010003638
PS: Creating a VM automatically creates its own Virtual Network Interface.
Create a 2nd VM in a 2nd Subnet called uksouth-subnet2. Enable IIS on second server and only allow web access to that server. Enable RDP and WWW for uksouth-vm1.
Use the RUN Command to run the following;
Set-NetFirewallProfile -Enabled False
Install-WindowsFeature Web-Server


Assign the appropriate Application Security Groups to VM1 and VM2.

A typical VM in Azure need the following parts to be successfully deployed and assessed.
New-AzVm `
    -ResourceGroupName "UKS-ResourceGroup" `
    -Name "VMName" `
    -Location "UK South" `
    -VirtualNetworkName "UKS-VNET" `
    -SubnetName "UKS-Subnet1" `
    -SecurityGroupName "UKS-NetworkSecurityGroup" `
    -PublicIpAddressName "VM-PublicIpAddress" `
    -OpenPorts 80,3389
Site 1 – UK South
In this exercise, we shall go ahead to create a second subnet and connect our network security group to both subnets uksouth-subnet1 and uksouth-subnet2.


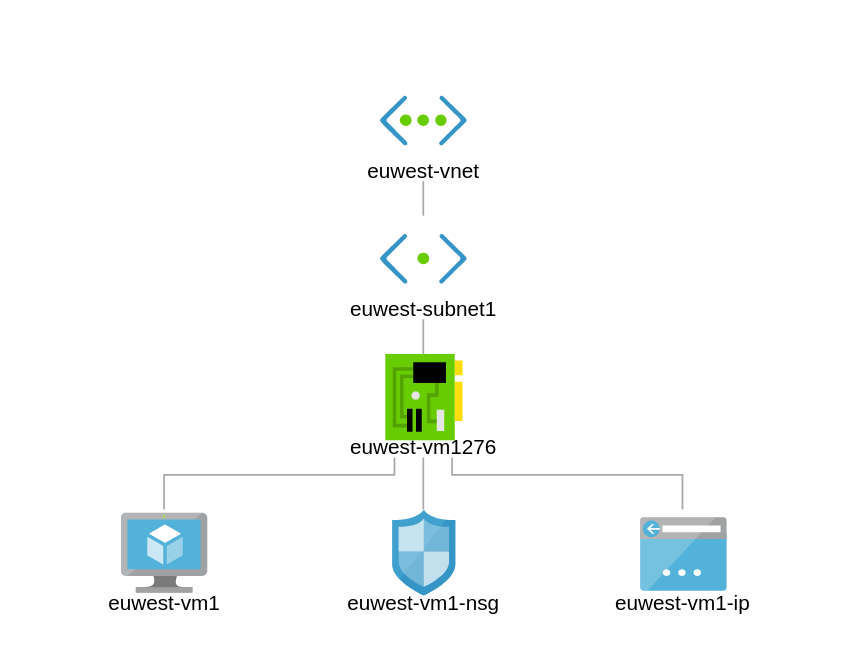
Site 2 – Europe West
Figure 2.0 depicts our new site in Europe West which has a VNet and 1 Subnet. Let’s go ahead to set up a VM and an NSG. We shall configure Peering later.

Configure Network Inter-Connection between Europe West and UK South
We achieve this by utilising Azure Global Peering;
With Global VNet Peering available, you can enable connectivity across all Azure public regions without additional bandwidth restrictions and as always keeping all your traffic on the Microsoft Backbone. Global VNet Peering provides you with the flexibility to scale and control how workloads connect across geographical boundaries, unlocking and applying global scale to a plethora of scenarios such as data replication, database failover, and disaster recovery through private IP addresses. You can also share resources across different business unit VNets, the hub-and-spoke model, as we refer to it, through a global peering connection. As your organization grows across geographic boundaries, you can continue to share resources like firewalls or other virtual appliances via peering.
We are going to be connecting uksouth-vnet to euwest-vnet which will allow our networks to reach each other.

Virtual network peering enables you to seamlessly connect Azure virtual networks. Once peered, the virtual networks appear as one, for connectivity purposes. The traffic between virtual machines in the peered virtual networks is routed through the Microsoft backbone infrastructure, much like traffic is routed between virtual machines in the same virtual network, through private IP addresses only.
Azure supports:
VNet peering – connecting VNets within the same Azure region
Global VNet peering – connecting VNets across Azure regions
VNet peering – connecting VNets within the same Azure region
Connecting 2 Azure VNets with VNet Peering in the same Region
 When VNets are in one Region, connecting them up does not require any further configuration or features as the connectivity stays in the same Azure backbone.
Global VNet peering – connecting VNets across Azure regions
In this exercise, we are going to create a connectivity to our United States Branch. Our VNet is in the East US Azure Region.
Create the Following:
VNet: eus-vnet
Subnet: eus-subnet1
Addressing: 10.10.40.0/16
Subnet 1: 10.10.40.0/24
VM: 10.10.40.100/24
Before we begin, why don’t we move the Europe-West NSG to the EUWest-Subnet1? To do this follow the steps below;
step 1 – click on nsg in topology
Step 2 –

Step 3 – Click on Associate Subnet – click on associate to select the subnet to connect the nsg to

Step 4 – select virtual network and subnet to associate nsg with

At this point you would realise that the NSG i attached to the Network Interface as well as the Subnet. See figure 2.2 for this.

Let us head over to the Network Interface Card to disassociate from the Network Security Group.
On the topology click on NSG – Select Network Interfaces – Dissociate from the associated Network Interface

Now Europe West is consistent with our design requirements.
Full topology now;

Create Vnet for East US Branch

VNets and Locations

Europe and US Regions VNet Architecture
10.10.30.0/24
 In this diagram, you can see a fresh VNet with a single subnet. Let us create a VM and make it highly available.


Exercise: Move NSG to Subnet

NSG currently attached to NIC and Subnet.

Remove NSG association to NIC
Click on NSG>Network Interfaces>Right Click on NIC and Dissociate

Verify topology

To consider connecting to vnets across your regions, you will need to create the following;
Go ahead and create a /28 gateway address. Remember Azure always takes the first 3 addresses and the last address.
east-us vnet with gateway subnet

A virtual network (VNet) in Azure infrastructure services that is connected to other networks must have a gateway subnet, which contains the systems that exchange packets with other networks. The virtual network gateway uses specific subnet called the gateway subnet.It contains the IP addresses that the virtual network gateway resources and services use. The subnet must be named ‘GatewaySubnet’ in order for Azure to deploy the gateway resources.
Best practice: Configure a gateway for VPN Gateways
When you create a VPN gateway in Azure, you must use a special subnet named GatewaySubnet. When creating this subnet note these best practices:
The prefix length of the gateway subnet can have a maximum prefix length of 29 (for example, 10.119.255.248/29). The current recommendation is that you use a prefix length of 27 (for example, 10.119.255.224/27).
When you define the address space of the gateway subnet, use the very last part of the VNet address space.
When using the Azure GatewaySubnet, never deploy any VMs or other devices such as Application Gateway to the gateway subnet.
Don’t assign a network security group (NSG) to this subnet. It will cause the gateway to stop functioning.
Important
When working with gateway subnets, avoid associating a network security group (NSG) to the gateway subnet. Associating a network security group to this subnet may cause your VPN gateway to stop functioning as expected.
Create Gateway to enable East US to speak to West Europe

Create a connection from East EUS to UK South. UK South already has a VNet Peer to West Europe. For the Global VNet-VNet Peering from the USA, we need to create a GatewaySubnet as well as a VPN Gateway for UKSouth and then create IPSec connections between both sites.
How our sites look at the moment;


DNS Services
More to come shortly on the subject. In the meantime, Microsoft has great documentation on the subject.