Create Load Balanced Linux Webservers in Azure Step by Step is what this article aims to help you achieve. There are real benefits to load balancing and IBM puts it this way;
As strain increases on a website or business application, eventually, a single server cannot support the full workload. To meet demand, organizations spread the workload over multiple servers. Called “load balancing,” this practice prevents a single server from becoming overworked, which could cause it to slow down, drop requests, and even crash.
Load balancing lets you evenly distribute network traffic to prevent failure caused by overloading a particular resource. This strategy improves the performance and availability of applications, websites, databases, and other computing resources. It also helps process user requests quickly and accurately.
Pre-requisites
- Resource Group
- Virtual Network
- Subnet
- Network Security Group
Create Resource Group

az group create --name resouceGroupName --location $location
Create Virtual Network and Subnet

az network vnet create \
		--resource-group resouceGroupName \
		--name virtualnetworkName \
		--address-prefixes 172.16.0.0/16 \
		--subnet-name subnetName \
		--subnet-prefixes 172.16.10.0/24
Create NSG on Azure and Inbound Rule

az network nsg create \
--resource-group resouceGroupName \
--name myNSG
Create NSG Inbound Rule
az network nsg rule create \
		--resource-group resouceGroupName \
		--nsg-name myNSG \
		--name myNSGRuleHTTP \
		--protocol '*' \
		--direction inbound \
		--source-address-prefix '*' \
		--source-port-range '*' \
		--destination-address-prefix '*' \
		--destination-port-range 80 \
		--access allow \
		--priority 200
Associate NSG to Subnet

azure network vnet subnet set --resource-group resouceGroupName \
		--vnet-name virtualnetworkName \
		--name subnetName \
		--network-security-group-name myNSG
Create Load Balancer

az network lb create \
		--resource-group resouceGroupName \
		--name myLoadBalancer \
		--sku Standard \
		--public-ip-address myPublicIP \
		--frontend-ip-name myFrontEnd \
		--backend-pool-name myBackEndPool
Create Frontend IP

az network public-ip create \
		--resource-group resouceGroupName \
		--name myPublicIP \
		--sku Standard \
		--zone 1 2 3
Create Backend Pool

array=(myNicVM1 myNicVM2)
  for vmnic in "${array[@]}"
  do
    az network nic ip-config address-pool add \
		--address-pool myBackendPool \
		--ip-config-name ipconfig1 \
		--nic-name $vmnic \
		--resource-group resouceGroupName \
		--lb-name myLoadBalancer
  done
Create Load Balancing Rules – Port 80 allows access to the webservers over HTTP

az network lb rule create \
		--resource-group resouceGroupName \
		--lb-name myLoadBalancer \
		--name myHTTPRule \
		--protocol tcp \
		--frontend-port 80 \
		--backend-port 80 \
		--frontend-ip-name myFrontEnd \
		--backend-pool-name myBackEndPool \
		--probe-name myHealthProbe \
		--disable-outbound-snat true \
		--idle-timeout 15 \
		--enable-tcp-reset true
Create Health Probes
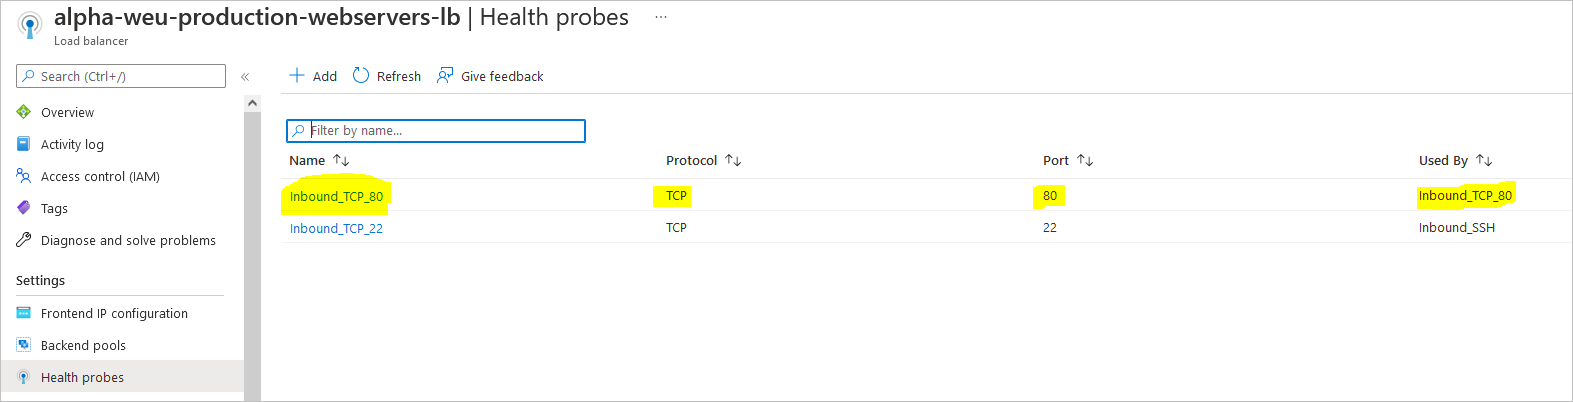
az network lb probe create \
		--resource-group resouceGroupName \
		--lb-name myLoadBalancer \
		--name myHealthProbe \
		--protocol tcp \
		--port 80
Create Network Interfaces for VMs
array=(myNicVM1 myNicVM2)
  for vmnic in "${array[@]}"
  do
    az network nic create \
        --resource-group resouceGroupName \
        --name $vmnic \
        --vnet-name myVNet \
        --subnet myBackEndSubnet \
        --network-security-group myNSG
  done
Create Virtual Machines

Create Virtual Machine #1
az vm create --resource-group resouceGroupName \
		--name webservervm1 \
		--vnet-name virtualnetworkName  \
		--subnet subnetName \
		--nics myNicVM1 \
		--image "Canonical:UbuntuServer:20.04-LTS:latest" \
		--admin-username azureuser \
		--generate-ssh-keys
Create Virtual Machine #2
az vm create --resource-group resouceGroupName \
		--name webservervm1 \
		--vnet-name virtualnetworkName  \
		--subnet subnetName \
		--nics myNicVM2 \
		--image "Canonical:UbuntuServer:20.04-LTS:latest" \
		--admin-username azureuser \
		--generate-ssh-keys
Add virtual machines to load balancer backend pool
array=(myNicVM1 myNicVM2)
  for vmnic in "${array[@]}"
  do
    az network nic ip-config address-pool add \
		--address-pool myBackendPool \
		--ip-config-name ipconfig1 \
		--nic-name $vmnic \
		--resource-group resouceGroupName \
		--lb-name myLoadBalancer
  done
Option for Outbound Connectivity for your Virtual Machines – Outbound Rules
Outbound rules enable you to explicitly define SNAT (source network address translation) for a standard SKU public load balancer. This configuration allows you to use the public IP or IPs of your load balancer for outbound connectivity of the backend instances.

Create NAT gateway
az network public-ip create \
		--resource-group resouceGroupName \
		--name myNATgatewayIP \
		--sku Standard \
		--zone 1 2 3
Create NAT gateway resource
Use az network nat gateway create to create the NAT gateway resource. The public IP created in the previous step is associated with the NAT gateway.
az network nat gateway create \
		--resource-group resouceGroupName \
		--name myNATgateway \
		--public-ip-addresses myNATgatewayIP \
		--idle-timeout 10
Associate NAT gateway with subnet
Configure the source subnet in virtual network to use a specific NAT gateway resource with az network vnet subnet update.
az network vnet subnet update \
		--resource-group resouceGroupName \
		--vnet-name myVNet \
		--name myBackendSubnet \
		--nat-gateway myNATgateway
Install NGINX on Ubuntu Servers
sudo apt-get -y update
sudo apt-get -y install nginx
Use vim to edit the default debian page on Ubuntu
Browse to the location of the index file. Make sure you are a super user in order to make the changes.
Customise your nginx webserver for both virtual machines
cd /var/www/html/
alpha-weu-production-webservers-vm01:/var/www/html$ ls -ltra
total 12
drwxr-xr-x 3 root root 4096 Apr 23 16:18 ..
-rw-r--r-- 1 root root  672 Apr 23 17:08 index.nginx-debian.html
drwxr-xr-x 2 root root 4096 Apr 23 17:08 .
alpha-weu-production-webservers-vm01:/var/www/html$
Modify the Index file


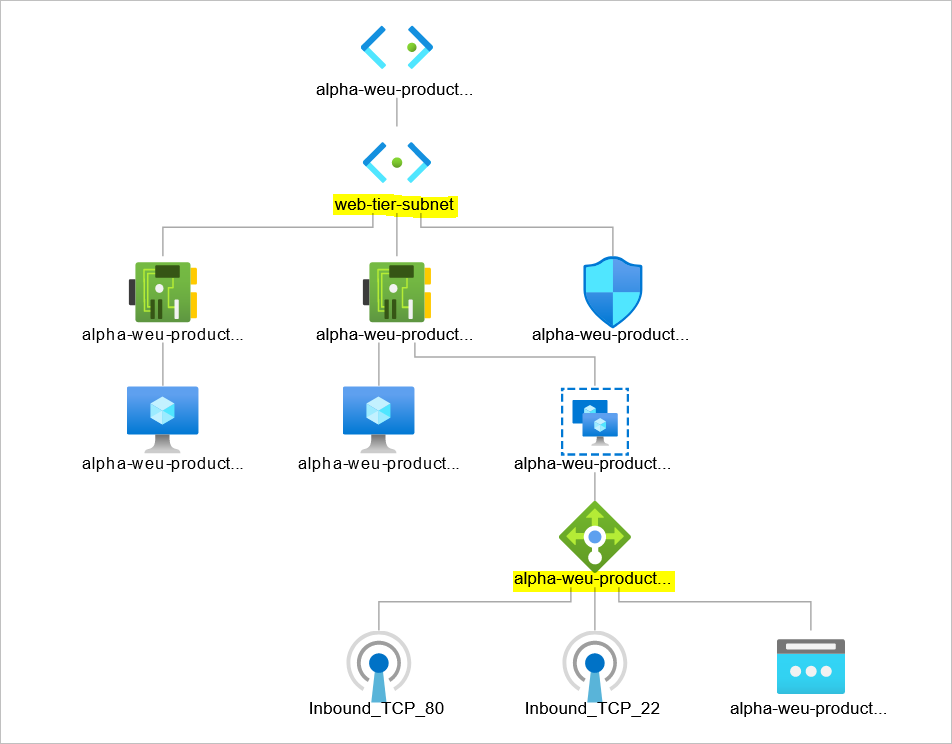
Topology of your perfectly load balanced linux webservers